Featured Tutorials
Our most popular and comprehensive tutorials to help you get the most out of AntiMicroX.
Complete Controller Mapping Guide
Learn how to map every button and axis on your gamepad to keyboard keys and mouse actions with detailed step-by-step instructions.
Step 1: Connect Your Controller
First, connect your gamepad to your computer via USB or wireless adapter. Make sure Windows recognizes your controller by checking the Device Manager. For wireless controllers, ensure they're properly paired and have sufficient battery life. Once connected, launch AntiMicroX and your controller should appear in the device list.
Step 2: Create a New Profile
Click "Add Profile" and give it a descriptive name like "FPS Games" or "Racing Games". This helps you organize different controller setups for different types of games. You can create multiple profiles and switch between them easily.
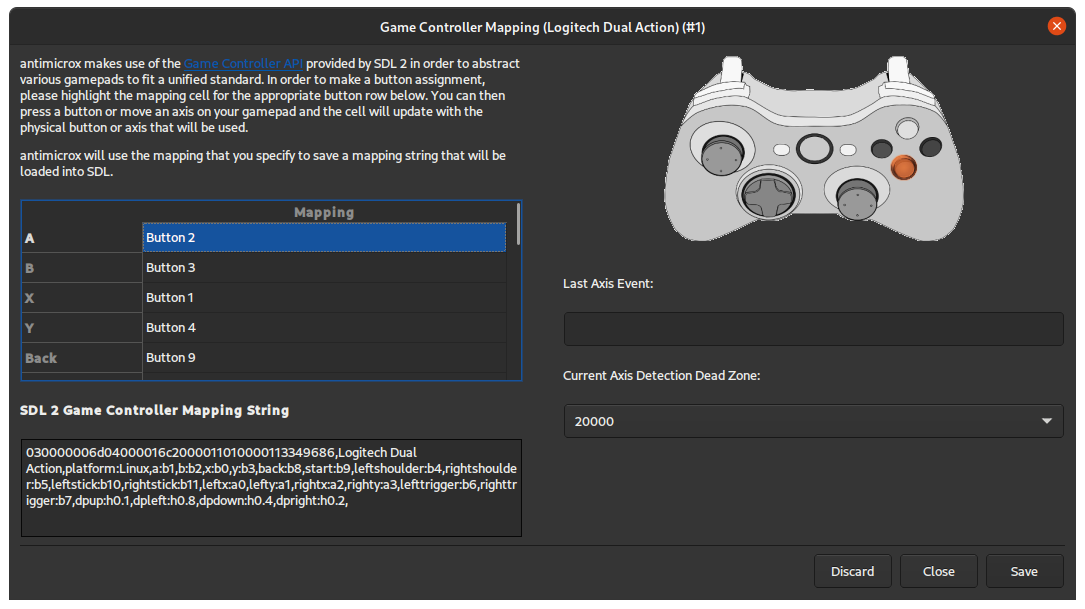
Step 3: Map Basic Buttons
Start with the face buttons (A, B, X, Y). Click on any button you want to map, then select the desired keyboard key or mouse action from the dropdown menu. For example, map the A button to Space (jump), B button to Shift (sprint), X button to E (interact), and Y button to R (reload).
Step 4: Configure Analog Sticks
Map the left analog stick to WASD movement (W=up, A=left, S=down, D=right). Map the right analog stick to mouse movement for camera control. Adjust the sensitivity settings to match your preferences - higher sensitivity for quick camera movements, lower for precise aiming.
Step 5: Set Up Triggers and Shoulder Buttons
Map the left trigger to right mouse button (aim down sights) and right trigger to left mouse button (shoot). Use shoulder buttons for secondary actions like grenades (G), melee (V), or special abilities. The D-pad can be used for inventory, map, or communication functions.
Step 6: Test Your Configuration
Click "Start" to activate your profile and test all your mappings. Open a text editor or game to verify that each button performs the expected action. Make adjustments as needed and save your profile when you're satisfied with the setup.
Advanced Macro Creation
Master the art of creating complex macros and automated sequences for enhanced gaming performance and convenience.
Understanding Macros
Macros in AntiMicroX allow you to record and replay sequences of keyboard and mouse inputs. They're perfect for complex actions like building structures in Minecraft, executing combo moves in fighting games, or automating repetitive tasks in RPGs. A macro can contain multiple key presses, mouse clicks, and even delays between actions.
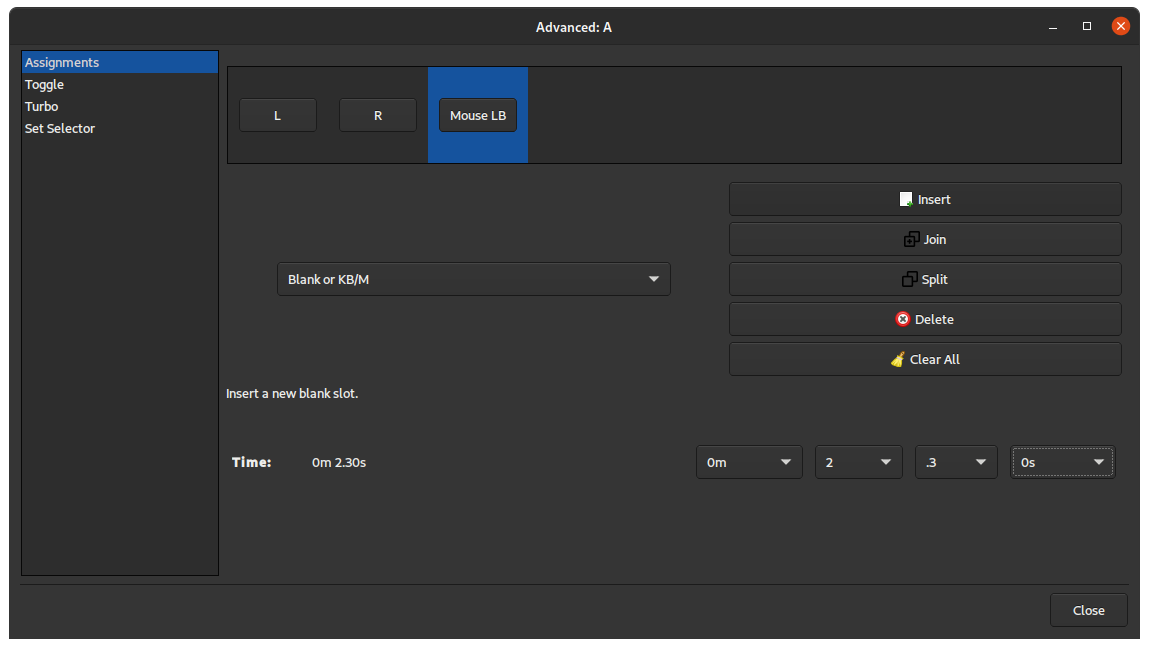
Creating Your First Macro
Select any button on your controller and choose "Macro" from the dropdown menu. Click "Record" and perform your desired sequence of actions. For example, for a Minecraft building macro, you might press W (move forward), right-click (place block), D (move right), right-click, S (move back), right-click, A (move left), right-click. Click "Stop Recording" when finished.
Editing Macro Timing
After recording, you can edit the timing of each action in the macro editor. Adjust delays between actions to make the macro faster or slower. For combat macros, you might want quick successive attacks, while for building macros, you might need longer delays to ensure blocks are placed correctly.
Advanced Macro Techniques
Use conditional logic in your macros by setting up different actions based on game state. For example, create a macro that checks if you have enough resources before attempting to build. You can also create looping macros that repeat until you press the button again, or macros that only activate when holding the button down.
Testing and Optimization
Always test your macros in a safe environment before using them in important situations. Start with simple macros and gradually increase complexity. Save different versions of your macros with descriptive names so you can easily switch between them. Remember that some games may have anti-cheat systems that detect macro usage.
Controller Calibration & Optimization
Fine-tune your controller settings for optimal performance, including dead zones, sensitivity, and response curves.
Understanding Dead Zones
Dead zones are areas around the center of analog sticks where small movements are ignored. This prevents unwanted input from stick drift. For most controllers, a dead zone of 0.1-0.2 works well. If your character moves without touching the stick, increase the dead zone. If movement feels sluggish, decrease it slightly.
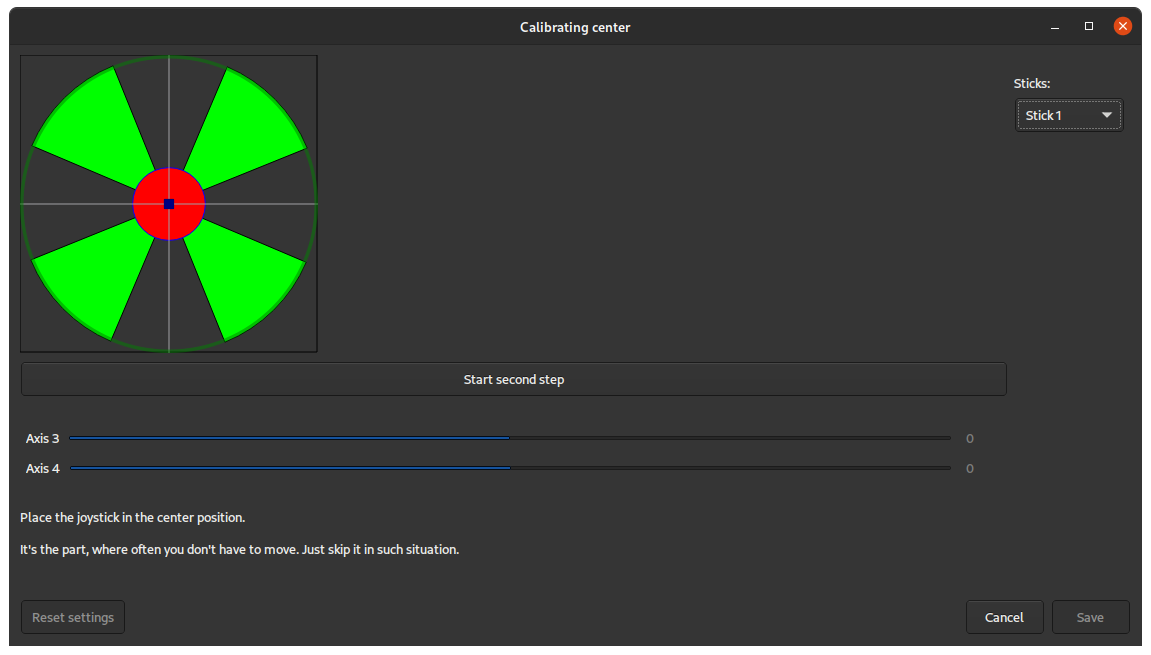
Calibrating Analog Sticks
Go to the Settings menu and select "Calibrate Controller". Follow the on-screen instructions to move each stick to its full range of motion. This ensures AntiMicroX accurately detects the full range of your controller's analog inputs. For precise aiming in FPS games, you may want to reduce the sensitivity of the right stick while keeping the left stick at normal sensitivity for movement.
Adjusting Sensitivity Curves
AntiMicroX offers different response curves for analog sticks. Linear curves provide consistent response across the full range, while exponential curves make small movements less sensitive and large movements more sensitive. For racing games, linear curves work best. For FPS games, try exponential curves for more precise aiming.
Trigger Calibration
Calibrate your triggers to ensure they register properly. Some controllers have triggers that don't reach 100% when fully pressed, which can affect games that require full trigger input. Use the trigger calibration tool to set the maximum and minimum values for each trigger. This is especially important for racing games where throttle control is crucial.
Button Response Time
Adjust button response time to match your gaming style. For competitive gaming, set shorter response times for faster reactions. For casual gaming, longer response times can prevent accidental double-presses. You can also set different response times for different buttons - for example, faster response for action buttons and slower for menu navigation.
Testing Your Settings
After calibration, test your settings in your favorite games. Pay attention to how the controller feels during different types of gameplay. Make small adjustments as needed and save your calibrated settings as a profile. Remember that different games may require different calibration settings, so don't hesitate to create multiple profiles for different game types.